Add Sample Information
Link your genomic samples to subject-level information including phenotypes, demographics, and other covariates that may be important for your analysis. This step connects your sequence data to the clinical and experimental context.
When to Add Sample Information
Add sample information after submitting your genomic data for annotation but before running advanced analyses. This allows you to:
- ▶Search and filter results by clinical phenotypes
- ▶Group samples by case/control status or other categories
- ▶Account for confounding variables in statistical analyses
- ▶Link multiple samples from the same subject
Required File Format
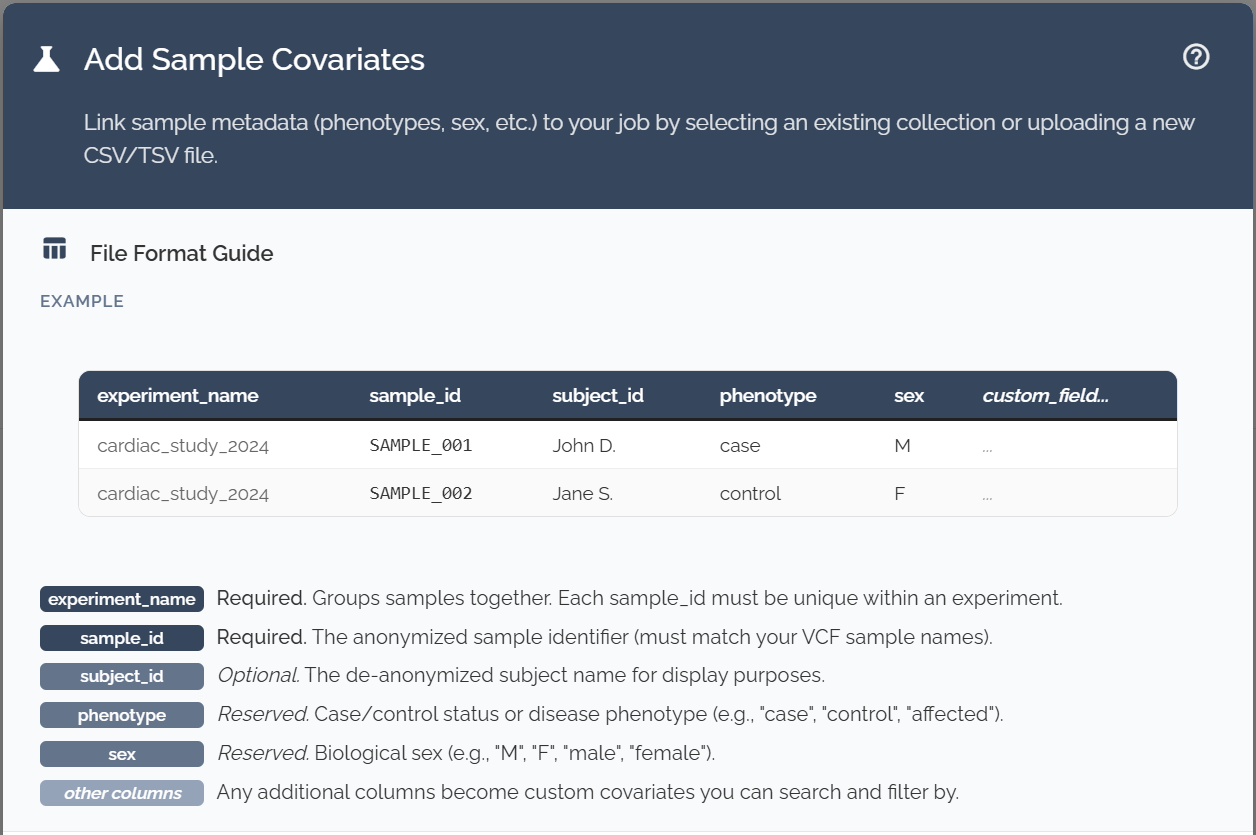
Your covariate file must include these three columns with exact header names:
Experiment Name
Name of your study or experiment
Sample ID
Must match IDs in your genomic data
Subject ID
Links multiple samples to same individual
"Your file is missing one or more of the required headers: Experiment Name, Sample ID, Subject ID"
This error appears when any of the three required column headers are missing or misspelled. Check that your headers match exactly (case-sensitive).
Additional Covariate Columns
Beyond the three required columns, you can include any additional information relevant to your study:
Common examples include:
- ▶Clinical: Case/control status, age of onset, diagnosis, treatment response
- ▶Demographics: Sex, age at collection, ancestry, socioeconomic factors
- ▶Experimental: Collection date, site, sample type, processing batch
- ▶Study-specific: Environmental exposures, family relationships, quality metrics
The system is flexible - include any variables that might be relevant for your analysis or could serve as potential confounders.
Example File Format
Sample CSV File:
Experiment Name,Sample ID,Subject ID,Sex,Age,Case_Control,Diagnosis,Collection_Date
Cardiac_Study_2024,SAMPLE001,SUBJ001,Female,45,Case,Hypertrophic_Cardiomyopathy,2024-01-15
Cardiac_Study_2024,SAMPLE002,SUBJ002,Male,52,Control,Healthy,2024-01-16
Cardiac_Study_2024,SAMPLE003,SUBJ003,Female,38,Case,Dilated_Cardiomyopathy,2024-01-17
Cardiac_Study_2024,SAMPLE004,SUBJ001,Female,45,Case,Hypertrophic_Cardiomyopathy,2024-06-15
Note: Subject SUBJ001 has two samples (baseline and 6-month follow-up)
Upload Process
Prepare Your File
Create a CSV or TSV (tab-separated) file with the required columns and your covariate data.
- ▶Ensure Sample IDs exactly match those in your genomic data
- ▶Use consistent naming for categorical variables
- ▶Avoid spaces and special characters in column headers
Navigate to Upload
In the Bystro interface:
- ▶Look for "Add subject level info" section
- ▶Enter your experiment name in the text bar
- ▶Upload your prepared covariate file
Link to Existing Experiment (Optional)
If you want to search by de-anonymized subject IDs:
- ▶Select "Add New Experiment"
- ▶Choose an existing name mapping or upload a new template
Troubleshooting
Double-check that your file includes exactly these column names:Experiment Name,Sample ID,Subject ID
Sample IDs in your covariate file must exactly match those in your genomic data. Check for extra spaces, different capitalization, or missing samples.
Save your file as CSV (comma-separated) or TSV (tab-separated) format. Excel files (.xlsx) are not currently supported. If using Excel to prepare your data, export as CSV before uploading.
Best Practices
- ✓Plan your covariates early: Think about what factors might affect your analysis before data collection
- ✓Use consistent coding: For categorical variables, use the same spelling and capitalization throughout
- ✓Document your variables: Keep a separate file explaining what each column represents
- ✓Handle missing data thoughtfully: Use consistent codes for missing values (e.g., "NA", "Unknown")
- ✓Validate before upload: Check that all Sample IDs in your covariate file exist in your genomic data
Start with a small test file containing a few samples to make sure the upload process works correctly before uploading your full dataset. This helps catch formatting issues early and saves time.
Next Steps
After successfully uploading your sample information, you can:
- ▶Filter and search your results using the uploaded covariates
- ▶Set up case/control comparisons for association testing
- ▶Download and analyze your results with integrated phenotype data